BL🅾G News


Actu G33k & admin stuff.

Aucun commentaire

In two step you're done !

You need to install unattended-upgrades from APT repository.

 apt install unattended-upgrades

Now you need to configure properly the package.

 dpkg-reconfigure unattended-upgrades

Answer YES

Finish. :)

MORE tips:

Enable Email Notification

# uncomment in /etc/apt/apt.conf.d/50unattended-upgrades
Unattended-Upgrade::Mail "My-super@mail.com";

Check this file /etc/apt/apt.conf.d/50unattended-upgrades many options are available.

Enjoy !

TAG: DEBIAN , SECU


by 🅴🆁🆁🅴🆄🆁32
🅴🅲🅷🔵🆂🆈🆂🆃🅴🅼


Commentaires fermés

i
Réparer Windows

FIX corrupted files

sfc /scannow

chdsk : réparer les erreurs de disque

chkdsk C: /F /R

bootrec : réparer le démarrage de Windows

bootrec /fixmbr
bootrec /fixboot
bootrec /rebuildbcd

Link: https://www.malekal.com/bcd-boot-configuration-data-windows

Method 2. How to repair Windows 10/11 using DISM

Windows 10/11 includes a command-line utility known as DISM (Deployment Image Servicing and Management). DISM command Windows 10/11 can be used to repair and prepare Windows images, including, Windows Setup, Windows Recovery Environment, and Windows PE. Also, DISM can be used to fix the recovery image within an installation of the operating system.

To repair Windows 10/11 using DISM commands:

To check whether there is any corruption, Run command line as administrator, then type the following syntax and press "Enter".

DISM /Online /Cleanup-Image /CheckHealth

To scan the Windows image for any corruption, type below command and hit "Enter".


DISM /Online /Cleanup-Image /ScanHealth

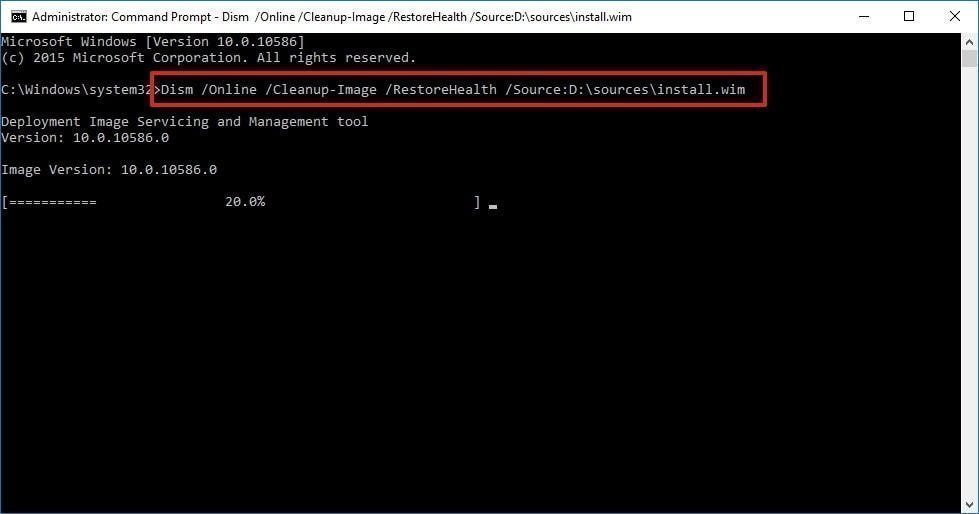
To fix Windows image, type the following command and hit "Enter".

DISM /Online /Cleanup-Image /RestoreHealth /Source:repairSource\install.wim

alt

REMOVE DLL

RIGHT click on the START button and select WINDOWS TERMINAL (ADMIN)

You can then list all of the drivers on your computer using pnputil /enum-drivers and find the one with WDCSAM64_PREWIN8.SYS or you can just look at the error message.

In my case the driver that needs to go is OEM26.INF

Uninstall the driver using pnputil /delete-driver oem.inf

You do NOT need a reboot so you can immediately retry to enable CORE ISOLATION and you should see a prompt to reboot once Core Isolation > Memory Integrity is turned ON.

alt
https://www.urtech.ca/2021/11/solved-core-isolation-memory-integrity-incompatible-drivers-wdcsam64_prewin8-sys/

GOD MODE

create directory with name:

GodMode.{ED7BA470-8E54-465E-825C-99712043E01C}

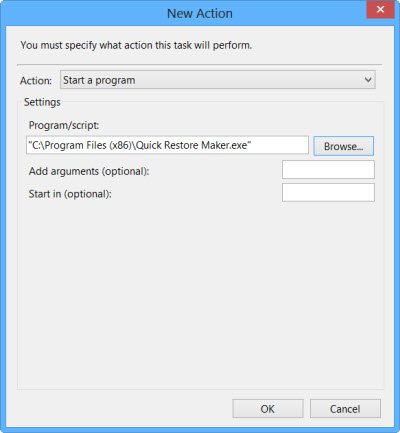
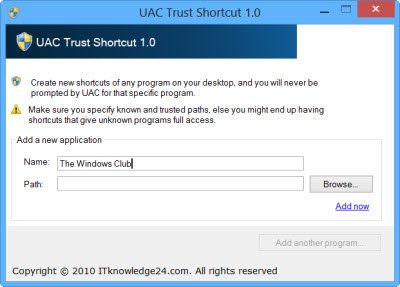
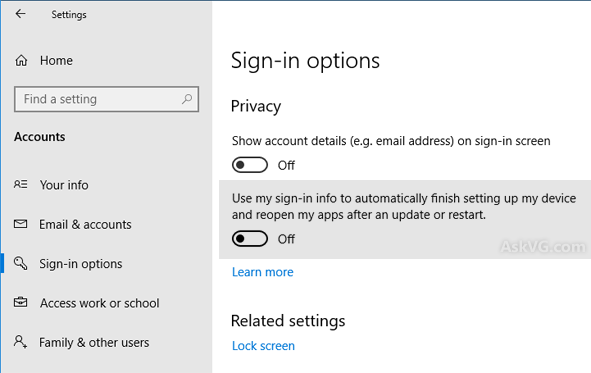
Restore PRG after boot

Restore Menu explorateur Windows 11

1. Utilisez Windows + S pour ouvrir la barre de recherche, tapez « cmd » et sélectionnez Exécuter en tant qu'administrateur.

2. Entrez la commande suivante dans la fenêtre de caractères de l'invite de commande et appuyez sur Enter pour exécuter la commande.

reg add HKCU\Software\Classes\CLSID\{86ca1aa0-34aa-4e8b-a509-50c905bae2a2}\InprocServer32 /ve /d "" /f

Commande reg add
Note : Si vous souhaitez retrouver le menu contextuel ayant le nouveau style de Windows 11, veuillez exécuter la commande suivante dans CMD :

 reg delete "HKCU\Software\Classes\CLSID\{86ca1aa0-34aa-4e8b-a509-50c905bae2a2}" /f.

ref: https://www.ubackup.com/fr/windows-11/windows-11-afficher-plus-d-options-par-defaut.html

BLOAT WINDOWS

iwr -useb https://git.io/debloat|iex


Aucun commentaire

This is a little old, but I was having the same problems, and none of the above was working. What I did was create a VBScript that ran at startup that opened said program.

i
Right-click on the program, go to properties, then compatibility and check "Run as Administrator"

Create the VBScript using a text editor (I use Notepad++)

Script:

Set WshShell = CreateObject("WScript.Shell" ) 
WshShell.Run """C:\Program Files (x86)\File\Program.exe""", 0 'Must quote command if it has spaces; must escape quotes
Set WshShell = Nothing

Note: that C:\Program Files (x86)\File\Program.exe is the full path to the program with extension. Also, make sure to save it as a .vbs

Now place the VBScript in the startup folder:

   %AppData%\Microsoft\Windows\Start Menu\Programs\Startup


Or, alternatively access it by Win+Rshell:startupEnter

I used this instead of a batch file because I did not want that ugly command window showing up.


Aucun commentaire

i
Moultes TIPS

Ajout /ADD certbot plugin apache !!

apt-get install python3-certbot-apache

----------

/dev/full

Linux has this fun device file called "/dev/full", which is like its more famous cousin "/dev/null", but when you write to "/dev/full", instead of throwing away the data, it fails.

It acts like a file on a filesystem that has just run out of space:

$ echo "Hello World!" > /dev/full
bash: echo: write error: No space left on device
$ echo $?
1

------------

This is a great little tool for testing that programs handle I/O errors correctly. It's inconvenient to create actual filesystems with no space left, or disks that actually fail, but it's really easy to ask a program to write its output to "/dev/full" and see what happens.

RCCONF


update-rcconf-guide

-------------

ERROR: systemd: service name='org.freedesktop.resolve1' unit='dbus-org.freedesktop.resolve1.service'

Create FILE `/etc/NetworkManager/conf.d/no-systemd-resolved.conf` with this content:


[main]
systemd-resolved=false

And then active it !


systemctl status systemd-resolved.service
systemctl enable systemd-resolved.service


Aucun commentaire

Créer un raccourci élevé pour exécuter le programme en contournant l'invite UAC dans Windows 11/10

i

Le contrôle de compte d'utilisateur ou UAC vous avertit essentiellement avant que des modifications ne soient apportées à votre PC - pas toutes les modifications, mais uniquement celles qui nécessitent des autorisations de niveau administrateur. Chaque fois que vous exécutez certains programmes, vous verrez d'abord l'invite UAC.
Ce n'est qu'après avoir donné votre consentement que le programme sera exécuté. Il s'agit d'une fonctionnalité de sécurité qu'il vaut mieux laisser à ce comportement par défaut. Mais vous pouvez avoir des programmes que vous exécutez très fréquemment et auxquels vous faites entièrement confiance . Dans de tels cas, l'invite UAC pourrait devenir un irritant.

Bien que vous ne deviez jamais désactiver les invites UAC pour l'ensemble de l'ordinateur, vous pouvez ignorer l'invite UAC et la désactiver pour certaines applications, à l'aide de Microsoft Application Compatibility Toolkit

Exécuter des programmes en contournant l'invite UAC


Si vous souhaitez désactiver l'invite UAC pour des programmes spécifiques, vous pouvez également créer un raccourci élevé pour le programme, qui vous permettra de contourner l'invite UAC et d'exécuter le programme sans voir l'invite UAC dans Windows.
C'est ainsi que vous pouvez le faire.

  1. Tapez Planifier des tâches dans Démarrer la recherche et appuyez sur Entrée pour ouvrir le Planificateur de tâches .
  2. Sous Actions, cliquez sur Créer une tâche.

  3. Suivez cet article pour savoir commentcréer une tâche dans le planificateur de tâches .
  4. Sous l'onglet Général, donnez un nom à la tâche, dites NoUAC1.
  5. Cochez Exécuter avec les privilèges les plus élevés.

Suivez ces étapes après avoir terminé les étapes ci-dessus.

Exécuter des programmes sans l'invite UAC


Sous l' onglet Action , cliquez sur le bouton Nouveau et naviguez jusqu'à l'emplacement du dossier du fichier exécutable du programme et sélectionnez-le. L'action doit être Démarrer un programme .

contourner l'invite uac

Sous l' onglet Paramètres , assurez-vous que l' option Autoriser l'exécution de la tâche à la demande est cochée.


Créer un raccourci de programme élevé


Une fois tout cela fait, cliquez sur OK. Une nouvelle tâche sera créée et vous pourrez la voir.


Créer un raccourci de programme élevé

Vous devrez maintenant créer un raccourci qui exécutera cette tâche.

Faites un clic droit sur le bureau > Nouveau > Raccourci. Dans l'assistant Créer un raccourci, saisissez :


schtasks    /run /TN "NoUAC1"  


Ici, NoUAC1 doit être remplacé par le nom de la tâche que vous avez choisie. Cliquez sur Suivant et quittez l'assistant après avoir exécuté son cours.


Vous pouvez maintenant lui attribuer une icône de votre choix. Pour cela, faites un clic droit sur le raccourci > Propriétés > Changer d'icône. Parcourez et sélectionnez l'icône souhaitée.

Maintenant, lorsque vous cliquez sur ce raccourci, vous pourrez contourner l'invite UAC.


Si cela représente trop de travail, vous pouvez utiliser cet outil gratuit pour créer un raccourci de programme élevé pour exécuter un programme spécifié en contournant l'invite UAC.


UAC Trust Shortcut est un logiciel gratuit qui vous permet de créer rapidement un raccourci élevé pour exécuter des programmes en contournant l'invite UAC. Il est disponible pour Windows 32 bits et 64 bits.


raccourci de confiance uac

Vous pouvez télécharger le raccourci UAC Trust ICI . Il nécessite d'être installé.


Bonne journée!


Source article: https://www.thewindowsclub.com/create-elevated-shortcut-run-programs-bypass-uac